23 Apr 2026
- 0 Comments
The Basics of Transit and Culmination
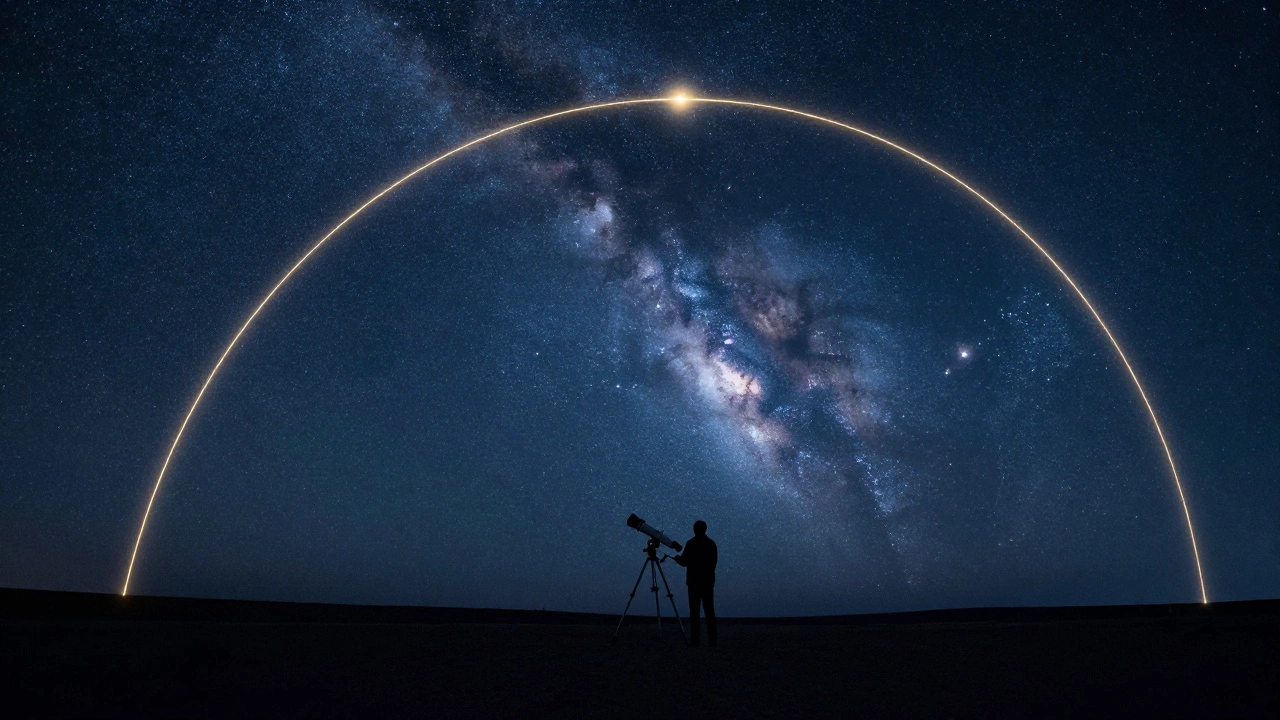
In the world of stargazing, we often use the words "transit" and "culmination" interchangeably, but there is a subtle difference. When we talk about transit and culmination is the moment a celestial body crosses the local meridian, reaching its highest point in the sky for that specific night. The Local Meridian is an imaginary line running exactly from due North to due South, passing directly over your head. When a planet or star "transits," it's crossing that line.
Technically, Culmination refers to the act of reaching the meridian. There are two types: upper culmination (the peak) and lower culmination (the lowest point, often below the horizon). For most of us, only the upper culmination matters. Why? Because the closer an object is to your zenith-the point directly overhead-the less atmosphere you're looking through. This means less shimmering, less distortion, and far more detail in your eyepiece.
Why Altitude Matters for Image Quality
Why not just observe an object as soon as it rises? The answer is "air mass." Think of the atmosphere as a thick, murky blanket. When an object is low on the horizon, you're looking through a massive slice of that blanket. This causes atmospheric extinction, where the air absorbs and scatters light, making dim objects vanish and bright ones look muddy.
When an object reaches its highest altitude during transit, the "column" of air between your lens and the target is at its shortest. This is where you'll find the best transparency. If you're trying to capture the faint tendrils of the Orion Nebula, doing so at culmination can be the difference between a grainy smudge and a detailed masterpiece. For a professional observer, the goal is always to maximize altitude to minimize the impact of the Troposphere, the lowest layer of the atmosphere where most of the turbulence happens.
Calculating the Peak Time
You don't need to do complex calculus to find these times, but knowing how the math works helps you plan. Transit times are based on Right Ascension (RA), which is essentially the longitude of the sky. Because the Earth rotates 15 degrees every hour, an object's RA tells you roughly when it will be overhead.
To find the exact time, you need to know your Local Sidereal Time (LST). When your LST exactly matches the Right Ascension of your target object, that object is transiting your meridian. For example, if you are targeting a star with an RA of 5h 30m, it will culminate when your local sidereal time is 5h 30m. Most modern astronomy apps handle this for you, but checking the "Transit" or "Culmination" field in your software is the secret to an efficient night.
| Altitude Angle | Atmospheric Interference | Best Use Case |
|---|---|---|
| 0° - 20° (Low) | Extreme / Heavy Shimmering | Wait for transit; avoid imaging |
| 20° - 45° (Mid) | Moderate / Noticeable | Visual scanning; wide-field shots |
| 45° - 90° (High) | Minimal / Crisp | High-res imaging; planetary detail |
Building Your Session Timeline
Effective session planning isn't about looking at one object; it's about sequencing. If you have three targets-say, the Andromeda Galaxy, the Pleiades, and the Ring Nebula-you shouldn't visit them in the order they appear in your list. Instead, map out their transit times.
- Map the Peaks: List the transit times for every target you want to see.
- Prioritize the Faintest: Give the dimmest, most detailed objects the priority slot right at their culmination.
- Fill the Gaps: Use the time between transits to observe brighter objects that are still high enough (usually above 30°) to look decent.
- The "Exit Strategy": Plan your final target for the end of the night, ensuring its transit occurs just before your cutoff time or as you're packing up.
Let's say you're in the Pacific Northwest. If a target transits at 11:00 PM, start your dedicated imaging run at 10:00 PM and end at midnight. This gives you a two-hour window of peak altitude, ensuring the object never dips into the "danger zone" of low-altitude distortion.
Common Pitfalls in Scheduling
One big mistake is ignoring the "Meridian Flip." If you use a German Equatorial Mount, your telescope can't actually point exactly at the meridian without hitting the tripod. This means that right at the moment of peak altitude, your mount might need to flip from the east side to the west side to keep tracking. If you don't account for this, your software might crash or your telescope might collide with its own pier.
Another trap is forgetting about the Horizon Profile. Culmination tells you the highest point, but it doesn't tell you if a giant pine tree or a neighbor's house is blocking the view. Always cross-reference your culmination altitude with a local map of your obstructions. If an object transits at 30° but you have a 40° tree line to the south, that object is effectively invisible to you, regardless of the math.
Tools for Precision Timing
You don't have to do this by hand. Tools like Stellarium are gold mines for this. In the "Information" or "Observation" tabs, Stellarium will tell you exactly when an object reaches its maximum altitude and what that altitude will be in degrees. This allows you to build a spreadsheet of transits for the entire month.
For those into deep-sky photography, using a Planning Tool like Telescopius is even better. It allows you to see a visual timeline of where an object is in the sky relative to the horizon throughout the night. You can literally see the "arc" of the object and pick the center of that arc for your shutter release.
Does every object transit every night?
Most stars and planets do, but because the Earth orbits the Sun, the transit time shifts by about 4 minutes every day. This means that over a few weeks, an object that transited at midnight will eventually transit at 8:00 PM, and eventually, it will transit during the day, making it invisible for a while.
Is culmination the same as the zenith?
Not necessarily. The zenith is the point exactly 90° overhead. Culmination is simply the highest point an object reaches. If an object's declination doesn't match your latitude, it will culminate at an angle-perhaps 60° or 40°-rather than passing directly through the zenith.
How does the meridian flip affect my planning?
A meridian flip usually happens right at or very near the time of culmination. If you are taking a long exposure, you should plan the flip before the object hits the meridian, or time your exposure to end just as it reaches the peak, then perform the flip and start a second session.
Can I observe objects before they transit?
Yes, but be aware that the quality will degrade. Generally, once an object is above 30° altitude, it's "usable." Between 30° and 60°, it's "good." Above 60° is "optimal." If you're just doing visual observing, you can start much earlier; for astrophotography, wait for that higher arc.
What is the relationship between Right Ascension and transit time?
Right Ascension is essentially the celestial equivalent of longitude. Since the Earth rotates, your local meridian "sweeps" across the RA of the sky. When the Local Sidereal Time (which is the RA currently on your meridian) equals the object's RA, the object is transiting.
Next Steps for Your Next Session
If you're just starting with this, don't overcomplicate it. For your next outing, pick one target and find its transit time using a free app. Try observing it once when it's at 20° and once when it's at its peak. You'll notice a shocking difference in the "steadiness" of the image. From there, start grouping your targets by their peak times to create a seamless flow for your night under the stars.