21 Jan 2026
- 0 Comments
When you point a camera at Jupiter and see nothing but a blurry dot, you’re not doing anything wrong-you’re just missing the right process. Planetary astrophotography isn’t about taking a single shot. It’s about capturing hundreds or even thousands of frames in a short video, then letting software pick out the best bits and stack them into a sharp, detailed image. This isn’t magic. It’s science, and it works better than most people realize.
Why Video, Not Still Images?
Planets are tiny in the sky. Even through a decent telescope, they’re no bigger than a grain of sand held at arm’s length. Atmospheric turbulence-what astronomers call "seeing"-makes them wiggle, blur, and shimmer every few seconds. A single exposure will almost always capture a smeared mess. But if you record a video at 30 to 100 frames per second, you freeze those fleeting moments when the air is calm. That’s when the planet looks sharpest. The trick is capturing enough of those moments so software can rebuild the image from them.
Most planetary cameras today are monochrome or color CMOS sensors designed for high-speed capture. They don’t have long exposure times like DSLRs. Instead, they pump out frames fast. A typical session might record 5 to 10 minutes of video. That’s 9,000 to 18,000 frames. You don’t need them all. You just need the best 10% to 20%.
Equipment You Need
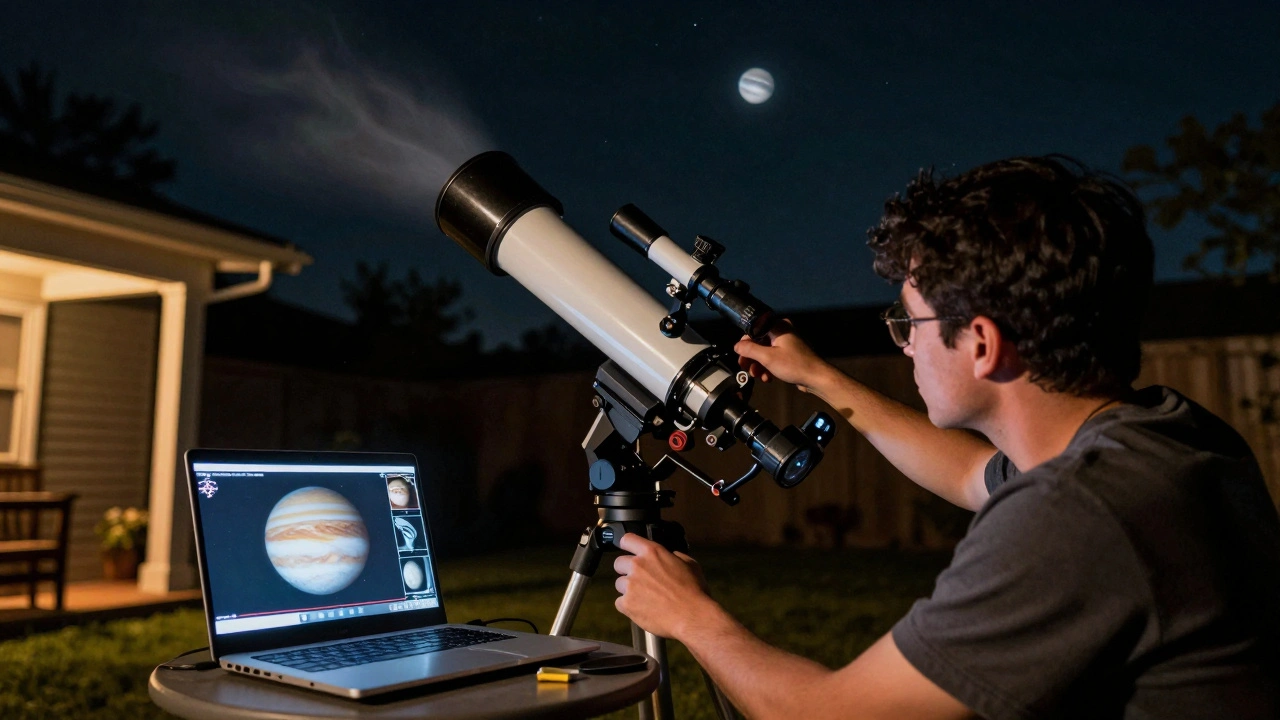
You don’t need a $10,000 rig to start. A decent 6-inch reflector telescope, a sturdy mount that tracks accurately, and a planetary camera like the ZWO ASI120MC-S or IMX585-based models will get you far. The mount matters more than you think. If it wobbles or drifts, even the best camera won’t help. Use a guide scope or auto-guiding if you can-it keeps the planet centered during long captures.
Filters help too. A blue (Wratten 47) or infrared pass filter can cut through atmospheric haze and boost contrast. For Jupiter and Saturn, a Luminance filter paired with color filters gives you more control later in stacking. You don’t need all the filters right away, but having at least one makes a noticeable difference.
Capturing the Video
Start by focusing carefully. Use a Bahtinov mask if you have one-it gives you a clear grid pattern to nail focus. Then, point at your target. Jupiter is easiest to start with. It’s bright, big, and has visible bands and moons. Saturn’s rings are a bonus challenge.
Set your camera’s exposure to around 10 to 50 milliseconds. Too long, and motion blur ruins the frame. Too short, and you get noise. Use the highest frame rate your camera allows. For most, that’s 60-100 fps. Record in .AVI or .SER format-these are standard for stacking software and preserve all frames without compression.
Don’t stop recording just because it looks blurry on screen. The atmosphere changes every few seconds. You might get 10 good frames in a row, then 50 bad ones. Keep going. The more data you collect, the better the final result. Aim for at least 5 minutes per target. If the seeing improves halfway through, you’ll be glad you kept going.
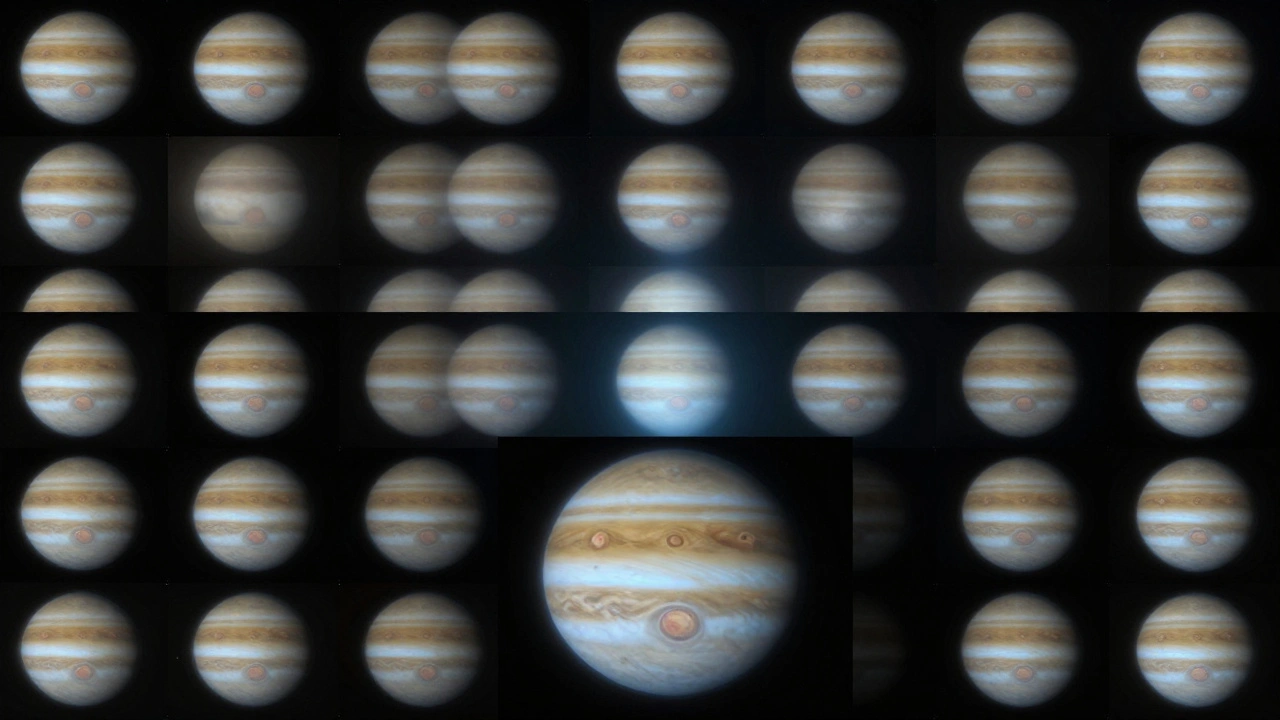
Image Stacking: The Secret Sauce
Stacking is where the real work happens. You take that long video and use software to align and combine the best frames. The goal? Reduce noise and sharpen details.
Here’s how it works:
- First, the software analyzes every frame and scores it based on sharpness, contrast, and stability.
- Then, it selects the top 10% to 20% of frames-the ones with the clearest details.
- It aligns those frames pixel by pixel, correcting for tiny shifts caused by air movement or mount wobble.
- Finally, it averages the aligned pixels to create a single, noise-reduced image.
Popular tools include AutoStakkert! (Windows), RegiStax (Windows), and PixInsight (cross-platform). AutoStakkert! is the most beginner-friendly. It has a simple interface: load your video, set the stack percentage, click "Stack," and it does the rest. It even lets you preview which frames it picked.
After stacking, you get a raw, slightly soft image. That’s normal. The next step is sharpening.
Sharpening and Processing
Stacking gives you structure. Sharpening gives you detail. Wavelet sharpening in RegiStax or the Wavelet Transform tool in PixInsight is the gold standard. It lets you boost fine details without turning the image into a harsh, noisy mess.
Start with low settings. Apply one level of sharpening at a time. Look at the cloud bands on Jupiter. Can you see the lighter and darker zones? That’s the goal. Too much sharpening? You’ll get halos around edges and noise that looks like static. Less is more. You can always go back and tweak.
Color balancing comes last. If you used a color camera, the default white balance might look off. Use the histogram or a neutral reference (like a star’s color) to adjust red, green, and blue channels. Don’t over-saturate. Jupiter’s reds should look like rust, not neon.
Common Mistakes and How to Avoid Them
Most beginners make the same three mistakes:
- Using too long an exposure. You’ll get motion blur. Stick to under 50ms.
- Stacking too many frames. The worst frames drag down the good ones. Stick to 10-20% of your total.
- Sharpening too hard. Noise becomes the star of the show. Apply sharpening in small doses.
Also, don’t shoot on nights with high humidity or strong winds. Even the best equipment can’t fix bad seeing. Check seeing forecasts from astronomy apps like Clear Outside or Weather Underground’s astronomy layer. If the seeing score is below 3/5, wait for a better night.
Real Results You Can Expect
With a 6-inch scope and a decent camera, you can resolve:
- Jupiter’s Great Red Spot and multiple cloud belts
- Shadows of Io and Europa crossing Jupiter’s face
- Separation of Saturn’s A and B rings
- Surface features on Mars during opposition
Compare that to a single exposure through the same scope-just a fuzzy blob. The difference isn’t subtle. It’s night and day. People who’ve never stacked images before often think they need a bigger telescope. They don’t. They need better technique.
What Comes Next?
Once you’ve nailed planetary stacking, try color imaging with separate filters. Capture red, green, and blue channels separately, then combine them in software. You’ll get colors that look like Hubble images-not just what your camera’s auto-white balance decided.
Or try lunar imaging. The Moon is brighter and easier to capture. Use the same technique to reveal craters, rilles, and mountain shadows in stunning detail. It’s great practice before moving on to fainter targets.
Planetary astrophotography rewards patience. It’s not about gear. It’s about time, repetition, and learning to read the sky. One night, you’ll capture a frame so sharp you’ll swear you saw a storm on Jupiter. Then you’ll stack it, sharpen it, and realize-you did it. No fancy lab. No college degree. Just a camera, a scope, and a little persistence.
Do I need a color or monochrome camera for planetary imaging?
Both work, but they serve different purposes. Color cameras (like the ZWO ASI120MC-S) are easier to start with-you get full-color images right away. Monochrome cameras (like the ZWO ASI174MM) need filters but give you higher resolution and sensitivity. If you’re just starting, go color. When you’re ready to push your results further, switch to monochrome with RGB filters.
Can I stack planetary images with free software?
Yes. AutoStakkert! has a free version that handles most planetary video files. RegiStax 6 is also free and widely used for sharpening. PixInsight has a free trial, but its full version costs money. You can build excellent planetary images using only free tools-no need to spend money unless you want advanced features like automated calibration or batch processing.
How long should my video capture be?
Aim for at least 5 minutes per target. For Jupiter and Saturn, 10 minutes is better. Mars requires longer captures because it’s smaller and dimmer. Don’t rush. The more frames you capture, the more options you have to pick the best ones. Even if the seeing seems bad at first, it often improves after midnight.
Why do my stacked images look blurry after processing?
Blurry results usually mean you stacked too many low-quality frames or didn’t align them properly. Double-check that your software selected only the sharpest 10-20% of frames. Also, make sure your telescope was focused perfectly before recording. Even a tiny focus error ruins stacking. Use a Bahtinov mask next time.
Is planetary astrophotography possible from a light-polluted city?
Yes, surprisingly. Planets are bright enough to cut through light pollution. Unlike deep-sky objects, they don’t rely on dark skies. You can get great results from urban backyards. The bigger challenge is atmospheric turbulence, not city lights. Focus on clear nights and steady seeing, and you’ll be fine.