
19 Apr 2026
- 0 Comments
When you use software to simulate a telescope, you aren't just looking at a map of the sky; you're simulating the optical physics of your specific gear. By printing these simulated views, you create a tangible reference that helps you identify objects without constantly glancing back at a glowing tablet screen that ruins your night vision.
Quick Wins for Field Prep
- Visual Matching: Print circles that match your eyepiece's true field of view (TFOV) to instantly spot targets.
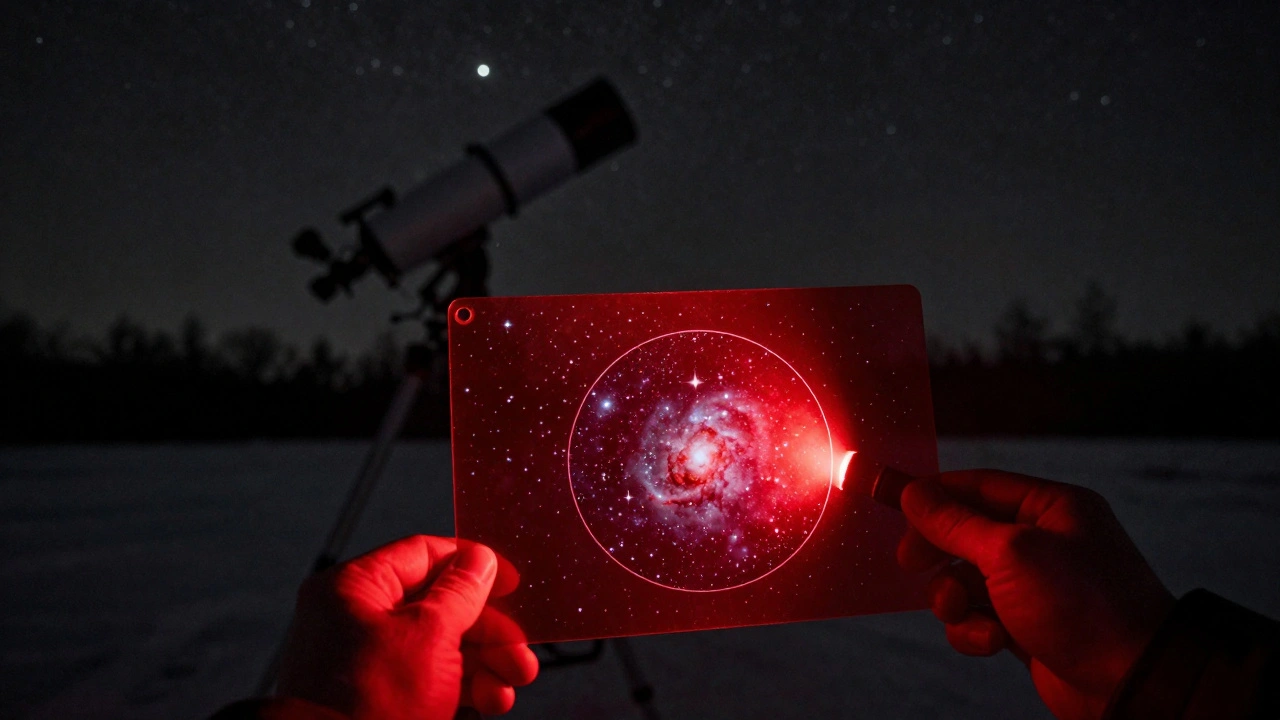
- Night Vision Preservation: Print on red-tinted paper or use red-filtered overlays to keep your pupils dilated.
- Target Mapping: Create a custom sequence of objects for a specific night, reducing time spent searching.
- Equipment Testing: Compare how different focal lengths will frame a nebula before you actually swap eyepieces in the dark.
The Mechanics of Simulation and Printing
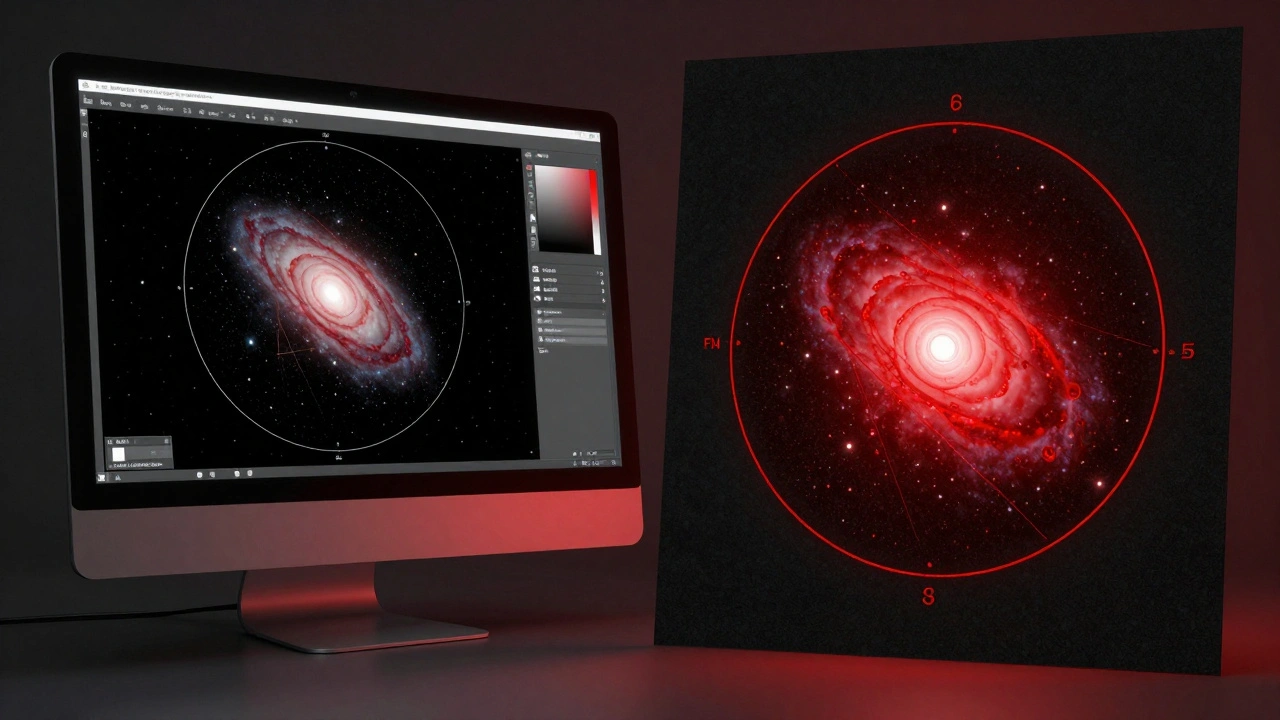
To get a printout that actually works in the field, you need to understand that a standard star map is useless for high-magnification viewing. A map shows you where Andromeda is in the constellation Andromeda, but a Stellarium is a free, open-source planetarium software that allows users to simulate the sky in real-time and mimic specific telescope optics simulation shows you exactly which stars will frame that galaxy when you're looking through a 12mm Plössl eyepiece.
The magic happens when you configure the "Telescope Plugin" in your software. You enter your Aperture (the diameter of your primary mirror or lens) and your focal length. Once the software knows your gear, it calculates the edge of the field. When you print this, you aren't printing a photo; you're printing a geometric map of the sky's coordinates projected through a lens.
If you're using a Dobsonian Telescope, which is a type of Alt-azimuth mount that uses a large aperture mirror for deep-sky observation, these prints are lifesavers. Since you're moving the scope by hand, having a printed 'target circle' tells you exactly how far to nudge the scope to find the next star in a cluster.
Matching Your Prints to Your Eyepieces
Not all prints are created equal. If you print a view based on a 25mm eyepiece but use a 10mm eyepiece in the field, your map is useless. You need to create a library of prints based on your most-used gear. Consider the relationship between the Apparent Field of View (AFOV), which is the angle of the circle you see when looking into the eyepiece, and the True Field of View (TFOV), which is the actual slice of sky visible.
| Eyepiece Type | Typical AFOV | Simulation Purpose | Print Recommendation |
|---|---|---|---|
| Plössl | 52° | General purpose viewing | Standard circular crop |
| Wide-Angle (Nagler) | 82°+ | Large nebulae / Star clusters | Wide-arc crop, high detail |
| Barlow Lens (2x) | N/A (Modifies) | Planetary / Lunar detail | Tight, high-zoom crop |
A pro tip here: don't just print the center of the view. Include a small 'context map'-a wider view of the constellation-next to the simulated eyepiece circle. This allows you to transition from 'finding the area' to 'centering the object' without getting lost.
Advanced Printing Techniques for the Dark
White paper is the enemy of the astronomer. The moment you flip open a bright white page, your eyes lose their dark adaptation, and it takes about 20 minutes to get it back. To solve this, you can use a few different methods. The most effective is printing on Red Acetate, which is a transparent red film that filters out short-wavelength light, or simply printing your charts using only red ink on black paper.
If you don't have a specialized printer, print your simulations in grayscale and then use a red LED flashlight to illuminate them. Another trick is to use matte paper. Glossy photo paper reflects the light from your flashlight directly back into your eyes, creating a glare that obscures the fine lines of your star chart.
Consider the scale of your print. A 1:1 scale simulation-where the printed circle is the same size as the physical eyepiece-can be a helpful tool for beginners to understand how much of the sky they are actually seeing. However, for most, a 4-inch diameter circle is the sweet spot for readability and portability.
Building Your Custom Field Guide
Instead of a random pile of papers, organize your prints into a binder. Group them by month or by target type. For example, create a "January Deep Sky" section featuring the Orion Nebula, which is a diffuse nebula situated in the Milky Way, being one of the brightest nebulae visible from Earth, and the Pleiades.
For each target, include these three elements on the page:
- The Finder View: A low-power simulation showing the target and its neighboring "guide stars."
- The High-Power View: A simulation showing the object as it appears under maximum magnification.
- The Offset Note: A note on whether the object is slightly off-center, which is common in some telescope designs due to optical alignment.
This systematic approach turns a telescope simulator from a screen-based toy into a professional planning tool. When you're out in the field at 2 AM in freezing temperatures, you won't want to be scrolling through a menu. You'll want to flip a page and see a visual representation of exactly what should be in your field of view.
Common Pitfalls to Avoid
One of the biggest mistakes is forgetting to account for Atmospheric Refraction, which is the bending of light as it passes through different layers of the Earth's atmosphere. If you are printing views for objects low on the horizon, the simulation might be slightly off. Always print targets that are at least 30 degrees above the horizon for the most accurate alignment.
Another common error is ignoring the "edge of field" distortion. Most simulation software assumes a perfect circle, but real eyepieces often have vignetting or slight distortion at the edges. Don't rely on the very edge of your print to find a star; always use the central 80% of the simulated view as your reliable zone.
Which software is best for printing telescope simulations?
Stellarium is the gold standard for most because of its free nature and highly accurate telescope plugins. For those needing more professional-grade planning, SkySafari is excellent, though it requires a paid version for full telescope simulation features. Cartes du Ciel is also a powerful open-source option for those who prefer a more technical, map-based interface.
How do I ensure the printed circle matches my actual eyepiece?
You must enter your telescope's focal length and the eyepiece's focal length into the simulator. To verify the print, hold the paper up to the eyepiece while looking at a known star field. If the stars on the paper align with the stars in the glass, your scale is correct. If not, adjust the 'Print Scale' setting in your software.
Can I print these for astrophotography instead of visual use?
Yes, but you'll need to switch the simulation from "Eyepiece View" to "Sensor View." This will simulate the rectangular crop of your camera's sensor (like a Full Frame or APS-C sensor) instead of a circular eyepiece view. This is vital for framing a galaxy perfectly before starting a long exposure.
Is it better to use a tablet or printed charts?
Tablets are more flexible, but they have two major flaws: battery death in the cold and light pollution. Even with a 'night mode' filter, a screen emits a broader spectrum of light than a red-illuminated piece of paper. Prints are a reliable backup that never run out of power and don't distract you from the actual sky.
What paper should I use for the best results?
Use heavy-weight matte cardstock. This prevents the paper from curling in humid night air and eliminates the glare caused by glossy coatings. If you have access to a laser printer, use it; ink-jet prints can sometimes smudge if they get damp from dew.
Next Steps for Your Observation Night
Once you've printed your charts, spend ten minutes doing a "dry run" at home. Look at your prints and then look at the simulated view on your screen. This helps you memorize the patterns before you're out in the dark. If you're a beginner, start by printing just three targets for your first night. Overloading yourself with a 50-page binder can be overwhelming. As you get more comfortable with your gear, expand your library to include more challenging objects like planetary nebulae or distant globular clusters.