27 Apr 2026
- 0 Comments
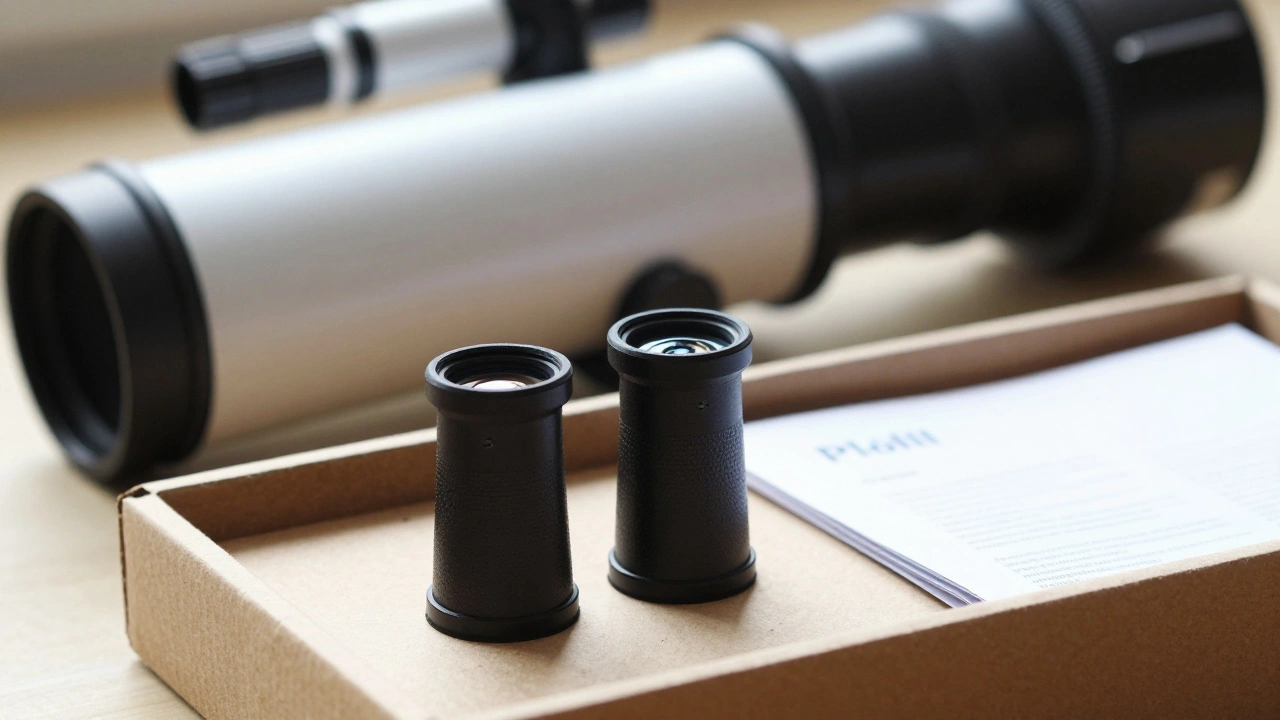
You just spent your hard-earned money on a shiny new telescope. You open the box, and there they are: two or three small glass tubes called eyepieces. Most manuals just tell you to "plug them in and look," but here is the catch: the glass included in the box is often the weakest link in your entire optical chain. It is like buying a high-end DSLR camera but being forced to use a plastic lens kit; you can see the stars, but you aren't seeing them the way they actually look.
Quick Takeaways for New Astronomers
- Stock eyepieces are usually functional but lack contrast and edge clarity.
- Most beginner kits use Plössl designs, which are reliable but have narrow views.
- Upgrading a single eyepiece can often improve your view more than buying a larger telescope.
- Avoid "high power" stock lenses that push your telescope past its physical limits.
The Reality of the "Free" Eyepiece
When a manufacturer bundles a telescope, they have to keep costs down to stay competitive. The easiest place to cut corners is the telescope eyepieces the removable lens attachments that magnify the image collected by the primary mirror or lens. These are often referred to as "stock" or "kit" optics. While they aren't useless, they are designed for general purpose use rather than high-fidelity observation.
Most beginners start with a Plössl Eyepiece a common symmetrical lens design that provides decent contrast and is found in most entry-level kits. If you look at your kit, you likely have a 25mm and a 10mm lens. The Plössl design is a huge step up from the ancient "Huygens" lenses of the 1970s, but in a cheap stock version, you will notice "vignetting"-where the edges of the view look dark or blurry-and a narrow field of view that makes it feel like you are looking through a drinking straw.
Understanding Magnification and the "Power" Trap
Many beginners get tricked by the marketing on the box, which shouts about "300x Magnification!" This is a red flag. Magnification is not a fixed number on the eyepiece; it is a relationship between the eyepiece and the Focal Length the distance between the lens and the point where the light converges to form a sharp image of the telescope tube.
To find your actual magnification, use this simple formula: Telescope Focal Length ÷ Eyepiece Focal Length = Magnification. If you have a 700mm telescope and use a 10mm stock eyepiece, you are at 70x. If you swap to a 4mm lens, you jump to 175x. The problem is that stock eyepieces often include a very small focal length lens (like 4mm or 6mm) that pushes the telescope beyond its "useful limit." When you do this, the image becomes dim, blurry, and shaky. You aren't seeing more detail; you are just magnifying the blur.
Spotting Low-Quality Glass
How do you know if your stock eyepieces are actually bad or just "okay"? Look for these three specific issues during your first few nights under the stars:
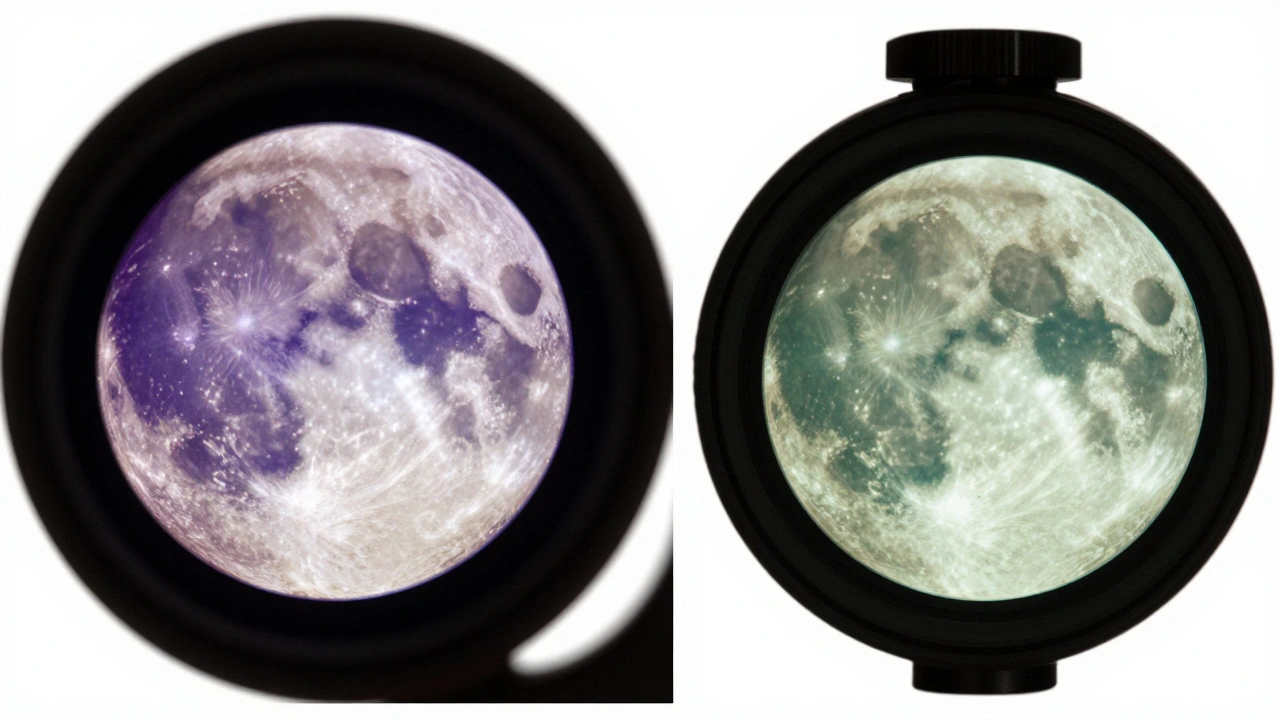
- Chromatic Aberration: Do the edges of the Moon or bright planets have a weird purple or green glow? That is a sign of low-grade glass that cannot focus all colors of light to the same point.
- The "Tunnel" Effect: When you look at a star cluster, is the center sharp but the edges look like they are warping or stretching? This is caused by poor lens curvature in cheap stock units.
- Eye Relief: Do you have to smash your eye against the glass to see the whole image? Higher-quality lenses allow you to hold your eye a comfortable distance away (about 15-20mm) while still seeing the full field.
| Feature | Kellar/Huygens (Very Cheap) | Stock Plössl (Common) | Wide-Angle Upgrade (Pro) |
|---|---|---|---|
| Field of View | Very Narrow (30-40°) | Moderate (50-52°) | Wide (68-82°) |
| Edge Clarity | Blurry/Distorted | Decent in center | Sharp across the frame |
| Eye Comfort | Poor | Average | Excellent |
| Price Point | Included in budget kits | Standard kit fare | $50 - $200+ extra |
The Role of the Barlow Lens
Many stock kits include a Barlow Lens an additional lens element that effectively doubles or triples the focal length of the telescope. This is a double-edged sword. A 2x Barlow turns your 25mm lens into a 12.5mm lens. While this is a great way to get more power without buying new glass, a cheap stock Barlow often introduces significant distortion. If you notice that your image is sharp with just the eyepiece but gets "muddy" the moment you add the Barlow, the Barlow is the culprit, not the telescope.
When Should You Actually Upgrade?
Don't rush out and spend $200 on a lens the day you get your telescope. Use the stock gear for a month. Learn how to align your Finder Scope a small, low-magnification telescope mounted on top of the main tube used for targeting objects and how to track the Moon. Once you can consistently find Saturn or Jupiter, you will realize that the stock eyepiece makes it hard to keep the planet in the frame because the view is too narrow.
Your first upgrade should be a wide-angle eyepiece. Instead of the 52-degree view of a Plössl, look for something in the 68-degree range. This doesn't change the magnification, but it expands the "window" you are looking through. It's the difference between looking through a keyhole and looking through an open door. You'll find that scanning the Milky Way for galaxies becomes much less frustrating when you can actually see a wider slice of the sky.
Practical Tips for Getting the Best View
If you are stuck with stock eyepieces for a while, there are a few tricks to maximize their performance:
- Cool Down Your Optics: Set your telescope outside 30 minutes before observing. If the glass is warm, you'll get "heat plumes" that make the stock lenses look even worse.
- Clean with Care: Stock lenses often have cheap coatings. Never rub a t-shirt on the glass. Use a Rocket Blower a hand-operated pump that blows a concentrated stream of air to remove dust without touching the glass to clear debris first.
- Stick to the Middle: Since stock lenses have poor edge quality, keep your target dead-center. Don't trust the details you see at the very edge of the circle; they are likely optical illusions caused by the cheap glass.
Can I use eyepieces from a different brand in my telescope?
Yes, as long as the barrel size matches. Most beginner telescopes use a 1.25-inch diameter. Check your eyepiece barrel; if it is 1.25 inches, you can buy almost any brand of eyepiece on the market and it will slide right in. Just avoid buying "universal" kits from random websites; stick to known brands like Celestron, Orion, or Meade.
Is a higher magnification eyepiece always better?
Absolutely not. Higher magnification means a narrower field of view and a dimmer image. If you use a 4mm eyepiece on a small telescope, the image will likely be too blurry to be useful. For most beginners, a magnification between 30x and 100x is the "sweet spot" for the Moon and planets.
Why is my stock eyepiece showing a black ring around the edge?
This is called vignetting. It happens when the eyepiece field stop is not perfectly aligned with the telescope's light cone, or the glass quality is too low to project the image to the edges. It's a classic sign of a budget stock eyepiece.
What is the first eyepiece I should buy to replace my stock ones?
Go for a 20mm or 25mm Wide-Angle eyepiece. Since you'll spend most of your time scanning the sky and looking at larger objects, a wide-field low-power lens provides the most immediate "wow" factor and makes finding objects much easier.
Do stock eyepieces damage the telescope?
No, they won't damage the mirrors or lenses of your telescope. They just don't let you see the full potential of the equipment. Using a cheap eyepiece is like using a low-resolution monitor with a powerful graphics card; the card is doing the work, but the monitor can't show it all.
Next Steps for Your Gear
If you've realized your stock glass is holding you back, start by auditing your focal lengths. If you have a gap-say you have a 25mm and a 10mm, but nothing in between-look for a 15mm lens. This "mid-range" power is often the most useful for viewing the moons of Jupiter or the rings of Saturn without losing too much light.
For those moving into astrophotography, stop using the stock eyepieces entirely. Invest in a dedicated camera adapter. Trying to take a photo through a stock eyepiece (called "afocal photography") usually results in a circular blur because of the poor edge quality we discussed earlier.