23 May 2026
- 0 Comments
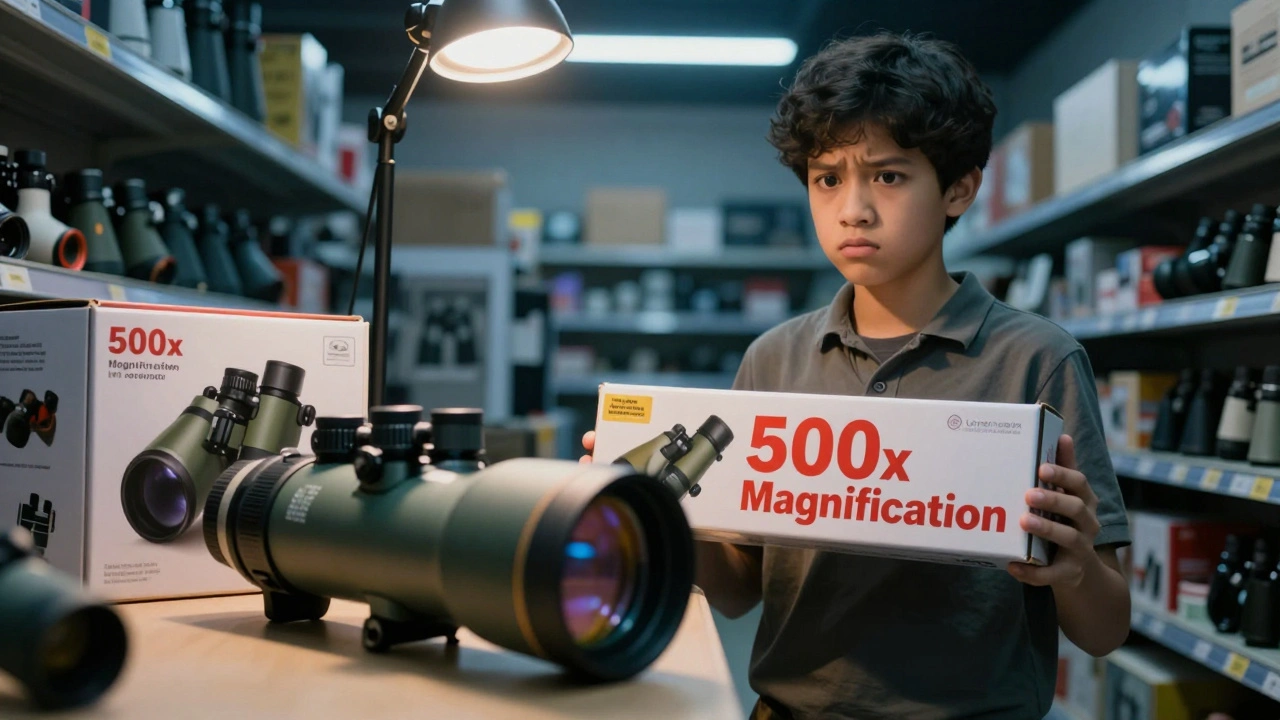
You walk into the electronics store or browse an online listing for a beginner telescope is an optical instrument designed for amateur astronomers to view celestial objects with clarity and ease. Often marketed with misleading specs like "500x magnification," these devices promise galaxy-crushing power but often deliver blurry disappointment. The box screams "500x Magnification!" in bold red letters. It sounds incredible, right? You can see craters on Mars so clearly you could count the rocks. But here is the hard truth that every seasoned astronomer knows: that number is almost entirely useless. In fact, chasing high magnification numbers is the single biggest mistake new stargazers make.
If you buy a telescope based solely on its advertised maximum magnification, you are likely buying a toy. To actually enjoy the night sky, you need to understand what makes a telescope work. It isn't about how much it zooms; it's about how much light it gathers. This guide cuts through the marketing hype to explain the three numbers that actually matter when choosing your first scope.
The Aperture: The Heart of the Telescope
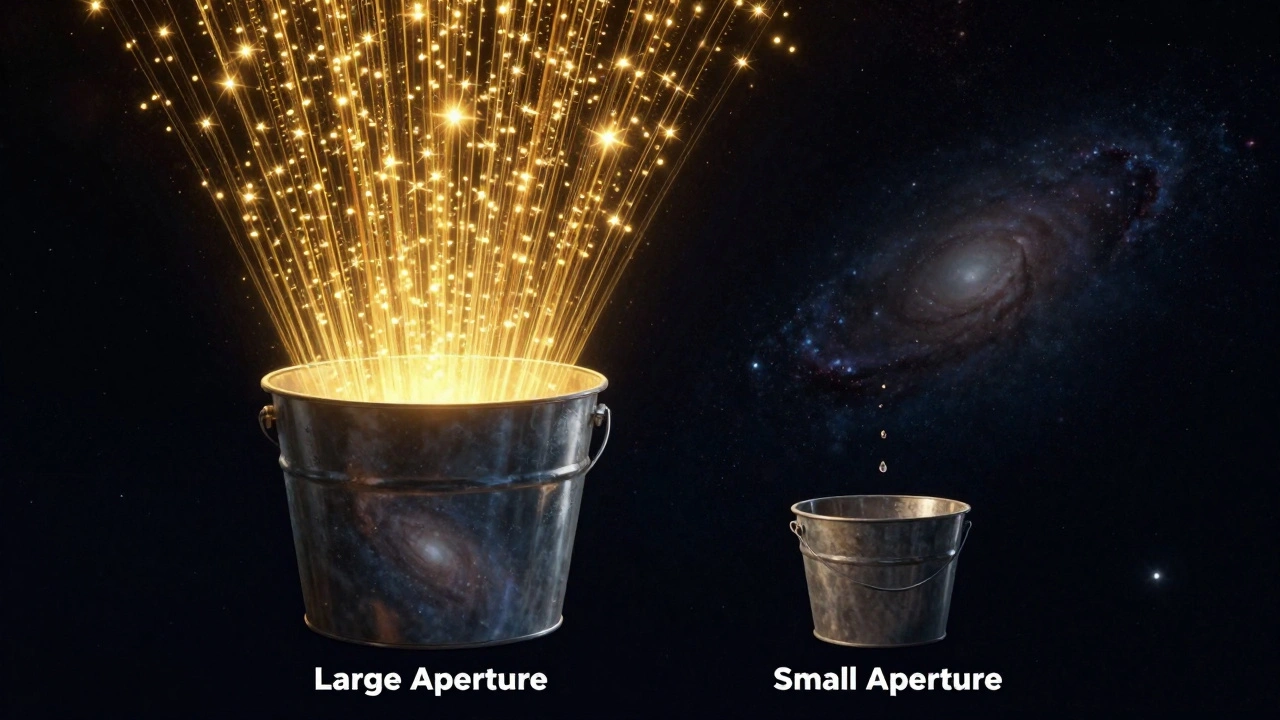
Forget the magnification label for a moment. Look at the diameter of the main lens or mirror. This measurement is called the aperture is the diameter of the primary light-gathering component of a telescope, determining its resolution and brightness. Think of aperture as the bucket size for collecting rainwater. If you want to catch more water (light), you need a wider bucket. A small bucket (small aperture) collects very little, while a large bucket (large aperture) fills up quickly.
In astronomy, light gathering power is everything. Most deep-sky objects-like nebulae, galaxies, and star clusters-are incredibly faint. They don't shine brightly like planets do. To see them, you need to collect as many photons as possible. A telescope with a 70mm aperture will show you significantly more detail and brighter images than one with a 50mm aperture, even if the smaller one claims higher magnification.
- Aperture determines brightness: Larger apertures make dim objects visible.
- Aperture determines resolution: It allows you to separate close double stars and see finer details on planets.
- The rule of thumb: For visual astronomy, bigger is always better, provided the mount can support it.
When shopping, look for an aperture of at least 70mm for refractors (lens-based) or 130mm-150mm for reflectors (mirror-based). These sizes offer a sweet spot between portability and performance. Anything smaller struggles to show anything beyond the Moon and bright planets. Anything larger becomes heavy, expensive, and difficult to set up for a beginner.
Focal Length and Focal Ratio: The Field of View
Once you have decided on aperture, the next critical spec is the focal length is the distance from the center of the primary optic to the point where light rays converge to form an image. Measured in millimeters, this number tells you how "long" the telescope tube effectively is optically. Combined with the aperture, it gives you the focal ratio (often written as f/ratio).
Why does this matter? Because focal length dictates your field of view. A short focal length (like 400mm) gives you a wide view of the sky. This is perfect for looking at large targets like the Orion Nebula or the Pleiades star cluster. A long focal length (like 1200mm) narrows your view, acting like a telephoto camera lens. This is great for zooming in on the Moon or Jupiter, but terrible for finding large, diffuse clouds of gas.
The focal ratio is calculated by dividing the focal length by the aperture. For example, a telescope with a 200mm aperture and a 1000mm focal length has an f/5 ratio. Fast telescopes (low f-numbers like f/4 or f/5) are brighter and better for deep-sky viewing. Slow telescopes (high f-numbers like f/10 or f/15) provide higher contrast for planetary viewing but require more precise focusing.
| Type | Typical Aperture | Typical Focal Ratio | Best For | Maintenance |
|---|---|---|---|---|
| Refractor | 70mm - 90mm | f/8 - f/10 | Planets, Moon, Bright Double Stars | None (Sealed tube) |
| Newtonian Reflector | 130mm - 150mm | f/5 - f/6 | Deep Sky Objects, Nebulae, Galaxies | Collimation required occasionally |
| Maksutov-Cassegrain | 90mm - 127mm | f/12 - f/15 | Planets, Moon, Compact Deep Sky | Low (Sealed tube) |
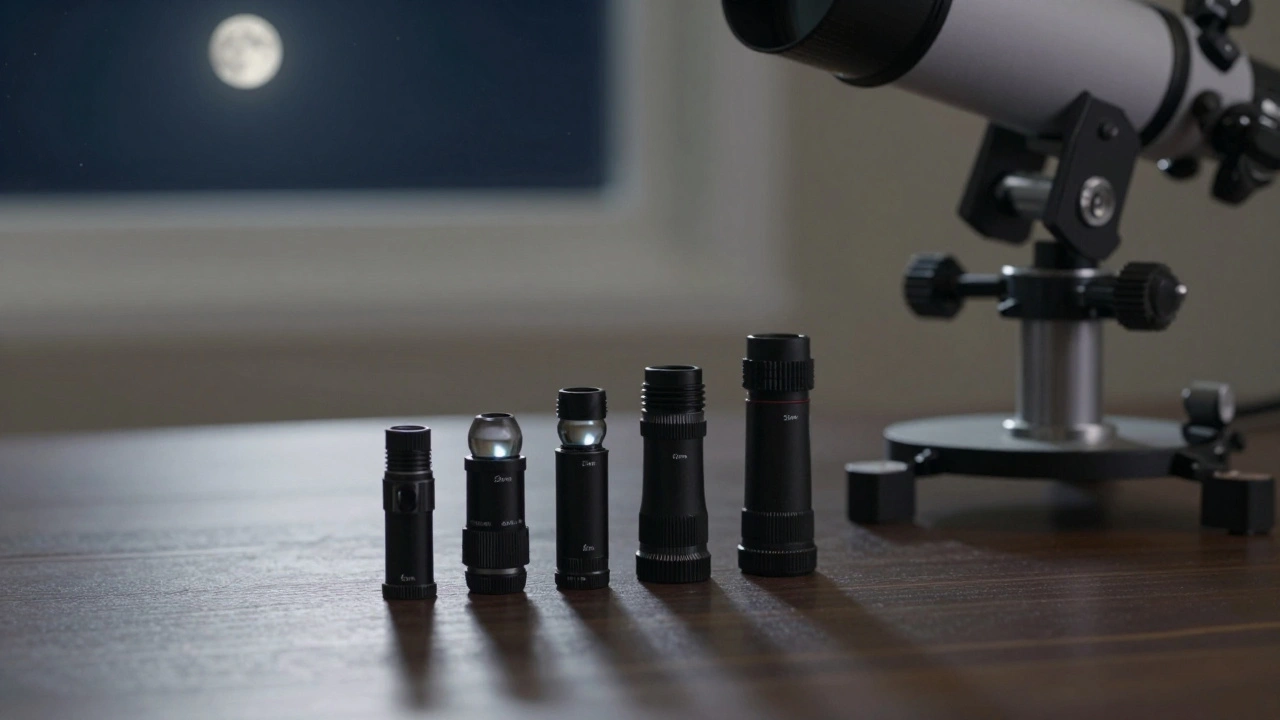
Eyepieces: The Real Magnification Control
Here is where the marketing trick happens. Manufacturers calculate maximum magnification by taking the focal length of the telescope and dividing it by the shortest focal length of the cheapest eyepiece they can include. They might throw in a 4mm eyepiece to claim "500x magnification." But using such a short eyepiece results in a dark, blurry, shaky mess. Your eye cannot resolve the detail, and the atmosphere distorts the image.
Magnification is not a fixed property of the telescope; it is determined by the combination of the telescope's focal length and the eyepiece is a small lens assembly inserted into the focuser of a telescope that magnifies the image formed by the primary optics. focal length. The formula is simple:
Magnification = Telescope Focal Length / Eyepiece Focal Length
If you have a telescope with a 1000mm focal length and use a 25mm eyepiece, you get 40x magnification. Switch to a 10mm eyepiece, and you get 100x. You control the zoom by swapping eyepieces, not by buying a specific "power" telescope.
Practical magnification is limited by the aperture. A good rule of thumb is that the useful maximum magnification is roughly 50x per inch of aperture (or 2x per mm). So, a 100mm aperture telescope has a practical limit of about 200x. Going beyond this yields no extra detail, only a darker, fuzzier image. Invest in two or three quality eyepieces (e.g., 25mm, 10mm, and 6mm) rather than relying on the cheap plastic ones included in the box.
The Mount: Stability Over Speed
A powerful telescope on a wobbly stand is useless. When you are magnifying an object 100 times, the slightest vibration from touching the scope or a gentle breeze turns the image into a blur. This is why the telescope mount is the mechanical structure that supports the telescope tube and allows it to be pointed and tracked across the sky. is just as important as the optics.
For beginners, there are two main types of mounts to consider:
- Azimuthal Mounts (Alt-Az): These move up-down and left-right. They are intuitive, stable, and easy to use. Most Dobsonian telescopes use this type. They are excellent for casual observing because they are sturdy and affordable.
- Equatorial Mounts (EQ): These are aligned with the Earth's axis. They allow you to track stars as they move across the sky by turning just one knob. While essential for astrophotography, they can be complex to set up for pure visual beginners.
Avoid flimsy tripod-style mounts that come with cheap department store telescopes. They shake too much. A heavy, solid base is non-negotiable. If you choose a reflector telescope, a Dobsonian mount (a large wooden or plastic base) provides the best stability for the price. It keeps the scope steady, allowing you to actually use the magnification you paid for.
Choosing the Right Type for Your Goals
Not all telescopes are created equal. The type of telescope you choose depends heavily on what you want to see and where you live. Understanding the trade-offs between refractors, reflectors, and compound scopes will save you money and frustration.
Refractors use lenses. They are sealed tubes, meaning dust doesn't get inside easily. They provide sharp, high-contrast views of the Moon and planets. However, to get a large aperture, you pay a premium. A 90mm refractor costs significantly more than a 150mm reflector. They are also prone to chromatic aberration (color fringing) unless they use expensive apochromatic glass.
Newtonian Reflectors use mirrors. They offer the most aperture for your dollar. A 150mm Newtonian will outperform a 90mm refractor in almost every way regarding deep-sky visibility. The downside is that they require occasional collimation (aligning the mirrors) and are open tubes, so dust gets in. They are also physically longer due to their optical design.
Maksutov-Cassegrains are compact hybrid designs. They combine lenses and mirrors to fold the light path, making them short and portable. They have long focal ratios, making them excellent for planetary viewing. They are sealed like refractors but offer more aperture in a smaller package. They are a fantastic middle-ground choice for apartment dwellers or travelers.
Common Pitfalls to Avoid
Before you click "buy," check your list against these common traps. Many beginners fall for marketing gimmicks that promise the moon but deliver headaches.
- The "Zoom" Eyepiece: Avoid telescopes that advertise a "zoom" eyepiece. These usually have poor optical quality and a narrow range. Fixed focal length eyepieces are sharper and more reliable.
- Finder Scope Quality: Ensure the finder scope (the small telescope attached to the side) is illuminated or at least well-aligned. Finding objects in the sky is half the battle. A red-dot finder is easier for beginners than a traditional optical finder.
- Accessories Bloat: Don't buy a kit just because it comes with ten accessories. Most cheap barlow lenses, filters, and star diagonals are optical trash. Buy a basic scope with good optics and add high-quality accessories later as you learn what you need.
- Light Pollution Ignorance: No telescope can overcome severe light pollution. If you live in a bright city, even a large aperture telescope will struggle to show galaxies. Focus on lunar and planetary viewing, or plan trips to darker sites.
Start simple. Get a solid 70mm refractor or a 130mm Dobsonian. Learn the sky with low power first. Use your eyes to find constellations, then bring up the telescope. As your skills grow, you will naturally know what upgrades you need. Remember, the best telescope is the one you actually take outside and use.
What is the best magnification for a beginner telescope?
There is no single "best" magnification because it changes based on the object you are viewing. However, for most beginner observations, magnifications between 50x and 150x are ideal. Lower powers (20x-40x) are great for finding large star clusters and nebulae, while higher powers (100x-150x) reveal details on the Moon and planets. Avoid using magnifications above 200x unless you have a very large aperture and perfectly still atmospheric conditions.
Should I buy a refractor or a reflector telescope?
It depends on your budget and viewing goals. Choose a refractor if you want low maintenance, high contrast views of the Moon and planets, and portability. Choose a reflector (specifically a Dobsonian) if you want the most value for money and plan to view deep-sky objects like galaxies and nebulae. Reflectors give you more aperture per dollar, which is crucial for seeing faint objects.
How important is the telescope mount?
The mount is critical. A shaky mount ruins the view regardless of how good the optics are. For beginners, a sturdy Alt-Azimuth mount (like a Dobsonian base) is recommended because it is stable, easy to use, and affordable. Avoid lightweight tripod mounts that come with cheap telescopes, as they vibrate too much at higher magnifications.
Can I see planets with a small beginner telescope?
Yes, absolutely. Even a small 60mm or 70mm refractor can show you the phases of Venus, the bands of Jupiter, and the rings of Saturn. While you won't see the level of detail shown in Hubble images, seeing these features with your own eyes is a magical experience. Planets are bright and compact, making them perfect targets for smaller apertures.
Do I need computerized tracking for my first telescope?
No, computerized GoTo mounts are not necessary for beginners. In fact, learning to manually locate objects helps you understand the sky and become a better astronomer. Manual mounts are cheaper, simpler, and more reliable. Once you have mastered manual finding and want to explore fainter deep-sky objects extensively, you can consider upgrading to a GoTo system later.