18 Jan 2026
- 0 Comments
Choosing the right eyepiece isn’t about spending the most money-it’s about matching what you pay to what you actually need. Too many beginners buy the first shiny eyepiece they see, only to realize it doesn’t improve their view at all. Others skip the upgrade entirely, thinking all eyepieces are the same. Neither approach works. The truth is, eyepieces make or break your telescope experience. A great one can turn a mediocre scope into something magical. A bad one can ruin even the best telescope.
What Even Is an Eyepiece?
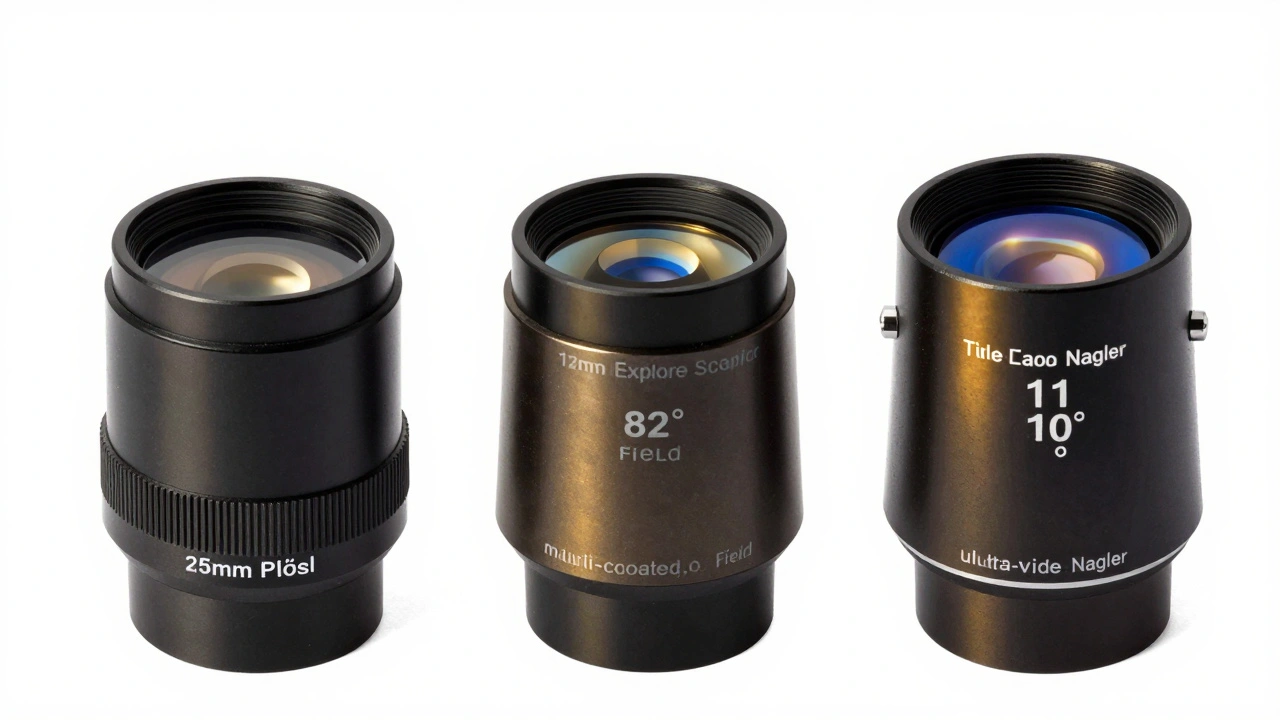
An eyepiece is the lens you look through when using a telescope. It’s not just a simple magnifier. It’s a complex set of glass elements designed to deliver a sharp, wide, and comfortable view of the sky. Every telescope comes with at least one basic eyepiece, usually a 25mm or 20mm Plössl. These work fine for wide views of the moon or bright planets, but they’re not built for detail, contrast, or long sessions. That’s where better eyepieces come in.
The key thing to understand: your telescope’s performance is only as good as its eyepiece. A $2,000 telescope with a $10 eyepiece will never show you what it’s capable of. And a $500 scope with a $100 eyepiece can surprise you.
How Eyepieces Affect Your View
Not all eyepieces are created equal. Here’s what really changes when you upgrade:
- Field of view - Cheap eyepieces give you a narrow window, like looking through a straw. Better ones open up to 68°, 82°, or even 100°, letting you see more of the sky at once.
- Edge sharpness - In low-cost models, stars near the edge of the view look blurry or stretched. Premium eyepieces keep everything pin-sharp across the whole field.
- Eye relief - This is how far your eye can be from the lens and still see the full view. If you wear glasses, you need at least 15mm of eye relief. Many budget eyepieces give you less than 10mm, forcing you to press your eye against the lens.
- Contrast and glare control - Better coatings reduce internal reflections. That means darker skies, clearer planetary details, and less haze around bright objects like the moon or Jupiter.
- Build quality - Metal barrels, smooth focus, and rubber eyecups make a difference when you’re out in the cold or trying to adjust things with gloves on.
What’s Your Budget? Here’s What You Get
Let’s break this down by price range. This isn’t about luxury-it’s about value.
Under $30: The Starter Eyepiece
Most telescopes include a 25mm or 20mm Plössl. It’s fine for the moon, Saturn, and big star clusters. But don’t expect crisp Mars views or detailed nebulae. These eyepieces have narrow fields (around 50°), short eye relief, and no fancy coatings. If you’re just testing the waters, this is acceptable. But if you’re serious, plan to upgrade within your first year.
$30-$70: The Sweet Spot for Beginners
This is where you start seeing real improvements. Look for 1.25" eyepieces with 68°-70° apparent field of view. Brands like Orion Sirius, Celestron Omni, and Meade UWA deliver solid performance here. A 32mm or 20mm in this range will give you wide, comfortable views of the Milky Way. A 10mm or 12mm will let you see Jupiter’s cloud belts clearly. You’ll notice better contrast and sharper edges. These are the most common upgrades for new observers.
$70-$150: The Performance Leap
This is where you enter the realm of premium eyepieces. Models like the Tele Vue Delos, Explore Scientific 82°, and Pentax XW start appearing here. These offer 82°-100° fields, 15-20mm eye relief, and multi-coated lenses that reduce glare like a high-end camera lens. Planets look three-dimensional. Deep-sky objects glow with detail. You can wear glasses and still see the full field. These are the eyepieces serious amateurs swear by.
$150+: The High-End Tier
These are for collectors, astrophotographers, or those who want the absolute best. Tele Vue Naglers and Panoptics fall here. They’re lightweight, have ultra-wide views, and deliver edge-to-edge sharpness even on fast telescopes (f/4-f/5). You’ll pay $200-$400 for one. Unless you’re chasing the finest planetary details or doing wide-field visual astronomy, this is overkill. But if you’ve tried everything else and still want more, this is where the magic happens.
What You Don’t Need to Spend On
There are traps. Don’t waste money on:
- Zoom eyepieces - They’re convenient, but rarely deliver sharpness across all magnifications. A fixed focal length will always outperform.
- “High magnification” eyepieces - A 6mm eyepiece sounds powerful, but if your telescope can’t support it (due to aperture or seeing conditions), you’ll just get a dim, blurry mess.
- Brand-new, untested brands - Stick with established names unless you’re buying used from a trusted source. Many cheap new brands copy designs but cut corners on glass and coatings.
Matching Eyepieces to Your Telescope
Not every eyepiece works with every scope. Here’s how to match them:
- Fast telescopes (f/4-f/6) - Need eyepieces with good edge correction. Avoid cheap Plössls. Go for 82° or wider designs.
- Slow telescopes (f/8-f/12) - More forgiving. Even budget Plössls can work fine here. You can stretch your budget further.
- Aperture matters - A 60mm refractor won’t benefit from a $200 eyepiece. A 12-inch Dobsonian? Yes. Match the eyepiece quality to your scope’s potential.
- Barlow lenses - A good 2x Barlow can double your eyepiece collection. Pair it with a mid-range eyepiece and you get two focal lengths for the price of one.
Real-World Examples
Let’s say you have a 130mm f/5 reflector. You’re looking at Jupiter and wish you could see more cloud detail. You start with the stock 20mm Plössl. It gives you 65x magnification. Not bad. But the view is flat, the edges are soft, and you can’t wear glasses.
You upgrade to a 12mm Explore Scientific 82°. Now you’re at 108x. The image is brighter, the contrast is higher, and Jupiter’s bands snap into focus. The wide field lets you see the whole disk at once, not just a tiny circle. You can wear your glasses. The eyepiece feels solid. You’re not squinting. You’re enjoying the view. That’s the difference.
Now imagine you have a 70mm refractor. A $150 eyepiece won’t make it show Mars like a 12-inch. But a $60 10mm eyepiece with decent coatings? That’ll give you clear views of the polar cap and the biggest surface features. You’re not chasing perfection-you’re chasing the best possible view for your scope.
Final Rule: Buy One, Test It, Then Decide
Don’t buy five eyepieces at once. Buy one. Try it. See how it changes your experience. Then decide what’s next. Most observers end up with three: a wide-field low-power (30mm-40mm), a mid-range (12mm-15mm), and a high-power (6mm-8mm). That covers everything from sweeping the Milky Way to studying lunar craters.
And remember: the best eyepiece is the one you’ll actually use. A $50 eyepiece you enjoy every night is better than a $200 one sitting in the drawer because it’s too heavy or too fiddly.
What’s the best eyepiece for a beginner?
For most beginners, a 1.25" 20mm or 25mm eyepiece with a 68° field of view and at least 15mm eye relief is ideal. Brands like Orion Sirius, Celestron Omni, or Meade UWA offer solid performance under $70. Avoid ultra-wide or zoom models at this stage-stick to simple, proven designs.
Do I need to buy eyepieces from the same brand as my telescope?
No. Telescope brands sell eyepieces, but they’re often basic models made for cost, not performance. Third-party brands like Tele Vue, Explore Scientific, or Pentax usually offer better optics, wider fields, and better build quality. Stick with 1.25" or 2" barrel sizes depending on your scope’s focuser.
How do I know if an eyepiece is too powerful for my telescope?
A general rule: don’t use more than 50x magnification per inch of aperture. For example, a 4-inch scope (100mm) shouldn’t go beyond 200x. Beyond that, the image gets dim, blurry, and shaky, especially under average sky conditions. Always test high-power eyepieces on the moon first-if the view is fuzzy, your scope can’t handle it.
Can I use a Barlow lens to save money on eyepieces?
Yes. A good 2x Barlow doubles your magnification options. Pair a 12mm eyepiece with a 2x Barlow to get 6mm performance. Just make sure the Barlow is multi-coated and has a metal barrel-cheap ones add distortion and reduce contrast. A quality Barlow is one of the best value upgrades you can make.
Should I buy 2" eyepieces instead of 1.25"?
Only if your telescope has a 2" focuser and you want wide-field views (like large nebulae or star fields). 2" eyepieces offer wider fields and lower magnifications, but they’re heavier and more expensive. For planetary or lunar viewing, 1.25" is usually enough. Don’t upgrade just because it’s bigger-upgrade because you need the field of view.