15 Apr 2026
- 0 Comments
Key Takeaways
- SHO (Hubble Palette) maps Sulfur, Hydrogen, and Oxygen to Red, Green, and Blue.
- HOO (Natural Look) focuses on Hydrogen and Oxygen for a more realistic red-and-blue appearance.
- Narrowband filters block out light pollution, making them essential for urban observers.
- Color balancing and stretching are just as important as the initial channel mapping.
The Building Blocks: H-alpha, OIII, and SII
Before we mix colors, we have to understand what we are actually photographing. In narrowband imaging, we aren't capturing a broad spectrum of light. Instead, we use filters that only let through a tiny slice of a specific wavelength. This is a game-changer if you live near a city, as these filters ignore most of the artificial light pollution and only let the "glow" of the nebula through.
H-alpha is a specific spectral line of hydrogen emitting at 656.3 nanometers. Because hydrogen is the most abundant element in the universe, this is usually your strongest signal. It defines the bulk of the nebula's shape and structure.
OIII is doubly ionized oxygen emitting at 500.7 nanometers. This typically shows up as a teal or blue-green light. In many nebulae, oxygen is concentrated in the hotter, high-energy regions, often near the central stars.
SII is singly ionized sulfur emitting at 672.4 nanometers. Sulfur is the hardest to capture because the signal is usually much weaker than hydrogen. However, it provides critical contrast and depth, showing us the "edges" and shockwaves of a nebula.
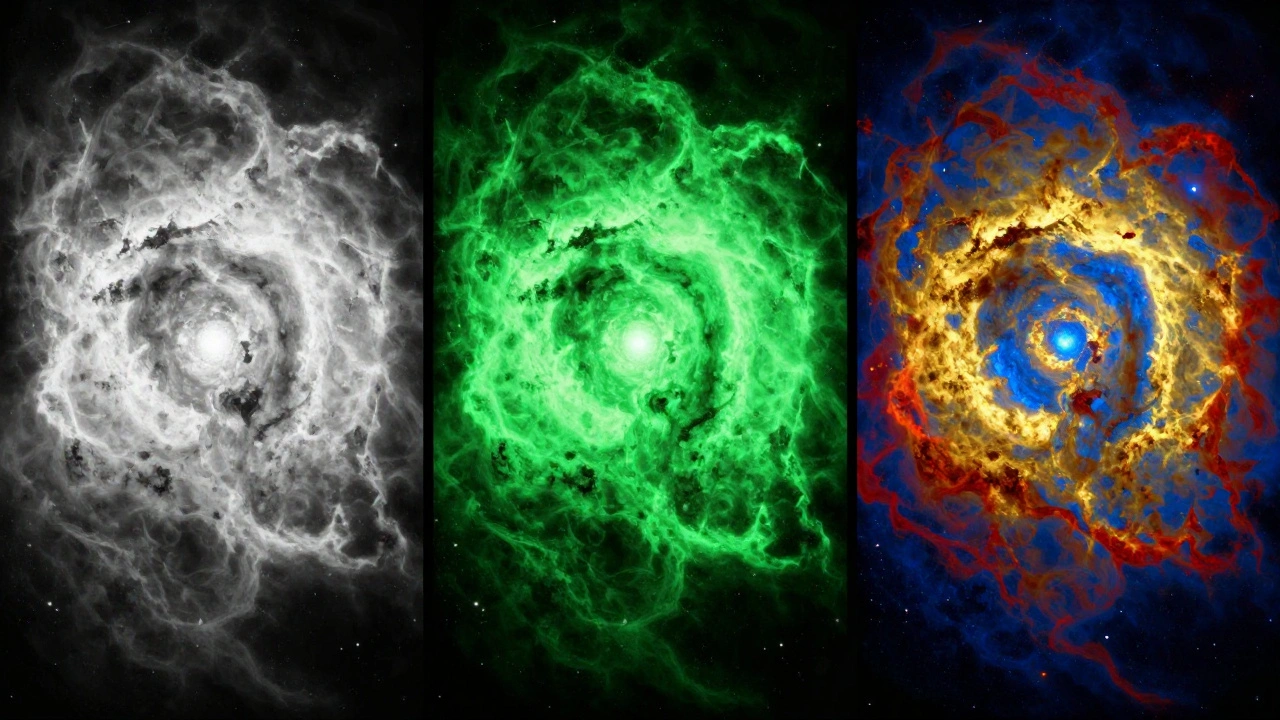
Decoding the SHO Palette (The Hubble Palette)
When you see a photo of the Pillars of Creation that looks like a futuristic cityscape of gold and blue, you are looking at the SHO palette. This isn't about what the nebula "looks" like; it's about differentiating the gases. Since H-alpha and SII are both in the red part of the spectrum, putting them both in the Red channel would make them impossible to tell apart.
To solve this, astronomers shifted the colors. In the Hubble Palette, the mapping works like this: SII goes to Red, H-alpha goes to Green, and OIII goes to Blue. Wait, why is H-alpha green? Because it's the strongest signal, and putting it in the center of the RGB spectrum allows the other two gases to frame it. This creates a high-contrast image where the sulfur-rich areas look red, the hydrogen-rich areas look gold/green, and the oxygen-rich areas look blue.
If you are using software like PixInsight or Adobe Photoshop, the process involves loading your three separate grayscale images into the R, G, and B channels respectively. However, a raw SHO map often looks a bit too "green" because the H-alpha signal is so dominant. This is where color calibration and the "SCNR" (Subtractive Chromatic Noise Reduction) process come in to shift those greens into a more pleasing gold.
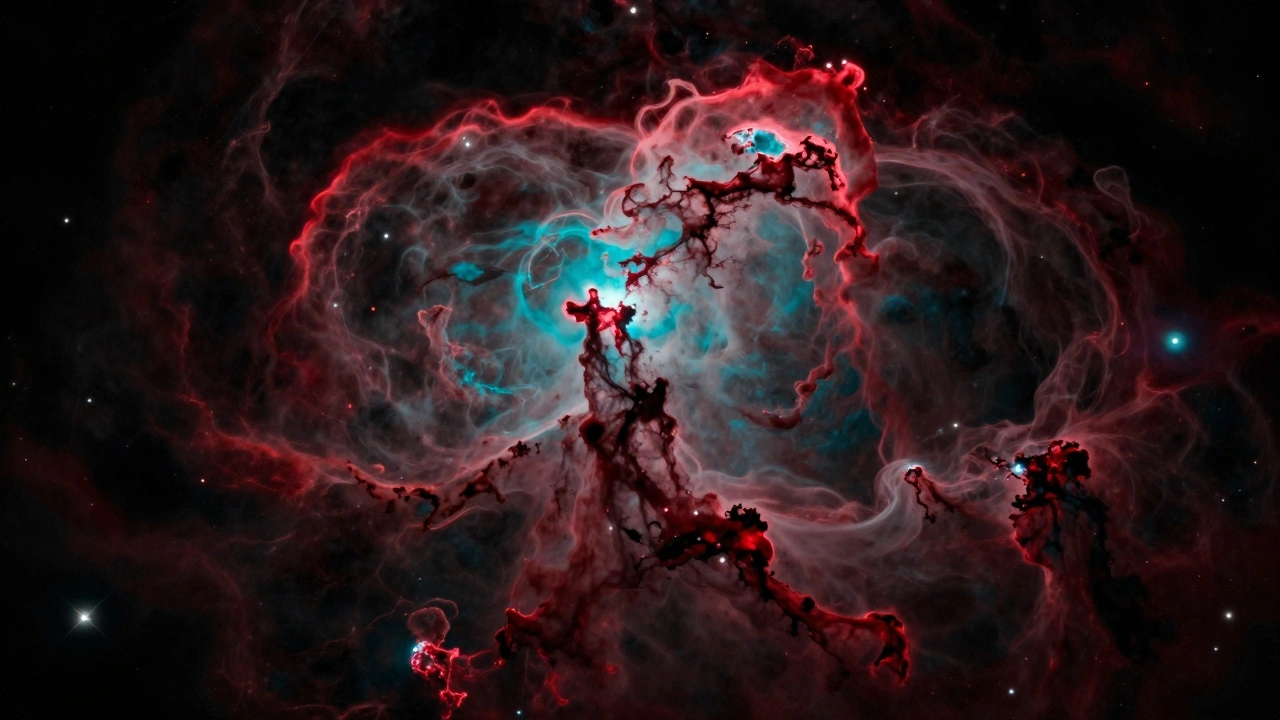
The HOO Palette: A More Natural Approach
Not every photographer wants their image to look like a science experiment. If you prefer a look that mimics what a very sensitive human eye might perceive, you want the HOO palette, which is a simplified combination using only Hydrogen and Oxygen.
In an HOO map, the mapping is straightforward: H-alpha is assigned to both the Red and Green channels (or just Red), and OIII is assigned to the Blue and Green channels. The result is a striking image dominated by deep reds and brilliant teals. Since you are omitting the Sulfur (SII) data, the image is often "cleaner" and easier to process, but you lose some of the structural detail found in the denser shockwaves of the gas.
| Feature | SHO (Hubble) | HOO (Natural) |
|---|---|---|
| Primary Goal | Chemical differentiation | Visual aesthetics / realism |
| Mapping (R,G,B) | SII, H-alpha, OIII | H-alpha, (H+O), OIII |
| Dominant Colors | Gold, Blue, Red | Deep Red, Teal/Blue |
| Data Needed | 3 Filters (SII, Ha, OIII) | 2 Filters (Ha, OIII) |
| Processing Effort | High (Needs color shifting) | Moderate |
Step-by-Step: Processing Your First Narrowband Image
Combining these filters is more than just clicking a button. If you simply stack them, the image will likely look muddy. Here is the workflow used by most pro-amateurs to get a clean result.
- Linear Calibration: Start with your calibrated, integrated frames for each filter. Do not apply any curves or levels yet. Everything should be in a linear state.
- Registration: Ensure all three images are perfectly aligned. If your stars are shifted by even one pixel between the SII and OIII frames, you will get weird rainbow fringes around your stars.
- Channel Assignment: Assign SII to Red, H-alpha to Green, and OIII to Blue for SHO. For HOO, put H-alpha in Red and OIII in Blue.
- Stretching: Use a tool like Histogram Transformation. This is where you pull the data out of the darkness. Because H-alpha is so much stronger, you may need to stretch the SII and OIII channels more aggressively than the H-alpha channel to balance the brightness.
- Color Correction: In an SHO image, use a saturation tool to pull back the green and push the yellow/gold. This transforms the "neon green" look into the classic Hubble gold.
- Luminance Layer: A pro tip is to create a separate Luminance (L) layer. Since H-alpha has the most detail, use it as your brightness map and overlay the SHO color map on top. This keeps the image sharp while maintaining rich colors.
Common Pitfalls and How to Avoid Them
One of the biggest mistakes beginners make is ignoring the Signal-to-Noise Ratio (SNR) of the Sulfur channel. Because SII is so weak, if you don't collect enough exposure time, the Red channel of your SHO image will be filled with grainy noise. If you only have 2 hours of SII but 10 hours of H-alpha, your colors will look blotchy. Aim for at least a 1:2 ratio of SII to H-alpha for a balanced image.
Another common issue is "over-stretching." When you push the levels too far to see the faint gas, you often blow out the stars, turning them into white blobs. To fix this, use a mask to protect the stars while you stretch the nebulosity. This ensures the gas looks vibrant without losing the pinpoint accuracy of the star field.
Finally, don't forget about the OIII filter's tendency to leak. Some cheaper filters allow a bit of moonlight or light pollution to seep through the oxygen window. If your OIII frames look washed out, try using a more precise 3nm filter rather than a 7nm one to tighten the window of light.
Which Palette Should You Choose?
Choosing between SHO and HOO depends entirely on your target and your goal. If you are shooting a classic emission nebula like the Orion Nebula or the Lagoon Nebula, HOO often feels more rewarding because it captures the "soul" of the object in a way that feels familiar. It highlights the contrast between the hot ionized oxygen and the cool hydrogen gas.
However, if you are targeting complex structures like the Eagle Nebula or the Trifid Nebula, go for SHO. The addition of the Sulfur channel allows you to see the dense "walls" of gas and the shockwaves caused by stellar winds. It turns a 2D-looking cloud into a 3D landscape. Plus, the gold-and-blue aesthetic is simply iconic and helps your work stand out in a gallery.
Can I do SHO imaging with a DSLR?
Not easily. Standard DSLRs have an internal filter that blocks much of the H-alpha light. To do this, you either need an "astronomically modified" camera where the internal filter is removed or a dedicated cooled astronomy camera. If you use a standard DSLR, your H-alpha frames will be extremely weak, making the SHO balance nearly impossible.
What is the best software for combining these palettes?
PixInsight is the gold standard for narrowband work because of its specialized tools like SCNR and PixelMath. However, Adobe Photoshop and GIMP are great for the final color grading. Many photographers use PixInsight for the heavy lifting and then move to Photoshop for the artistic touches.
Do I need a mono camera for this?
Yes. To capture SII, H-alpha, and OIII separately, you need a monochrome sensor and a filter wheel. While some "One Shot Color" (OSC) cameras now have dual-band filters, they usually only capture Ha and OIII simultaneously, which limits you to the HOO palette. For a true SHO image, a mono camera is required.
Why does my SHO image look too green?
This happens because H-alpha (assigned to Green) is almost always the strongest signal. To fix this, you can use the SCNR tool in PixInsight to remove the green cast, or in Photoshop, use a Selective Color adjustment layer to shift the Greens toward Yellow and Gold.
Can I mix HOO and SHO?
Not exactly, as they are different mapping methods. However, you can use the SII data from an SHO set to add "accent colors" to an HOO image. By adding a small amount of SII to the Red channel of an HOO image, you can add depth to the edges of the nebula without losing the natural look.
Next Steps for Your Workflow
If you've mastered basic SHO and HOO, try adding a Continuum layer. By taking a few long-exposure RGB frames, you can bring back the natural color of the stars, which often look weirdly multicolored in narrowband images. Simply mask the nebula and let the RGB data fill in the star field.
For those struggling with noise in the Sulfur channel, don't be afraid to increase your integration time. While it's tempting to move to a new target, spending an extra five hours on SII can be the difference between a grainy image and a professional-grade portfolio piece. Keep experimenting with the color balance-astrophotography is as much about art as it is about science.